
Most of our readers will be familiar by now with Apple’s Continuity suite, a slew of features which were introduced with iOS 8 and OS X Yosemite. These features include Instant Hotspot, a new AirDrop, SMS/Phone calls from Mac, and Handoff. With macOS Sierra and iOS 10, they added Auto Unlock and Universal Clipboard to the group.
The catch is of course that making use of these features requires certain hardware. Therefore, Macs from before about 2010/11 appear not to support some or all of the new functionality. However, it turns out there is a way to enable Continuity on your older hardware. In this guide we’ll go through how to do it.
The software we will be using is called Continuity Activation Tool, and it fools macOS into believing its hardware is compatible with Continuity’s requirements.
Continuity Activation Tool works on a selection of Macs, and depending on the model, requires either an upgraded Wi-Fi card, a USB Bluetooth LE dongle, or in some cases, no new hardware at all. It then forces the system to recognize the hardware as original and enables Continuity features.
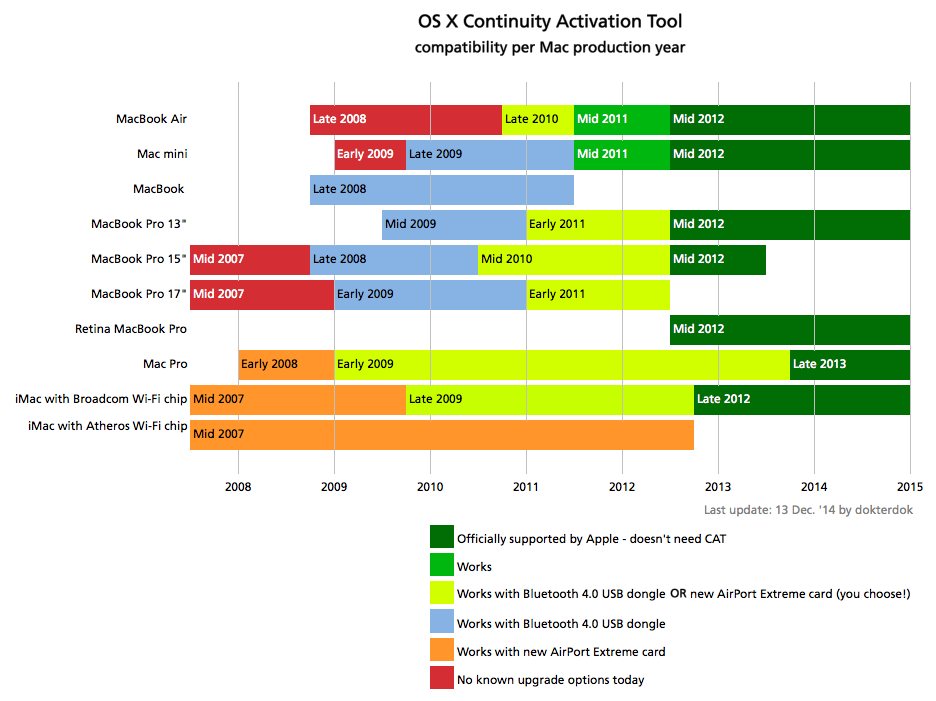
The above graphic is a reasonably accurate guide and breaks down the required hardware upgrade by Mac model and year. Many people will probably not value the features highly enough to upgrade their Wi-Fi card, but if you are one of those who requires only a cheap USB dongle, or better yet, only the tool itself, then this is a useful little hack that you may wish to try.
As always with these modifications, make sure to back up your system beforehand, especially as this tool is not fully certified to work on macOS Sierra or OS X El Capitan yet, though in my experience, it seems to.
Requirements to bring Continuity to unsupported hardware
- dokterdok’s Continuity Activation Tool.
- A Mac compatible with the process; check the above table.
- Any necessary hardware changes. If you require a Bluetooth dongle, I recommend the GMYLE BT LE dongle, which is compatible and cheap.
In this guide I used a Late 2011 MacBook Pro and a GMYLE dongle, and it worked perfectly. I have also successfully used Continuity Activation Tool with the same dongle on a Mid-2009 MacBook Pro on macOS 10.10, though it caused a kernel panic on macOS 10.11 and 10.12.
For this reason, make a full back up of the OS before beginning. In a worst-case scenario, you can restore from it if nothing else works. Remember: no backup before beginning, no sympathy for problems later.
Instructions to being Continuity to your old Mac
1) First, you must disable System Integrity Protection, or else your changes will not be permitted. Follow our simple instructions on how to turn off SIP.
2) Navigate to /System/Library and locate the two kexts called IO80211Family.kext and IOBluetoothFamily.kext.
3) Copy the two kexts files, and paste them to an external drive or USB pen for safekeeping in case of problems.
4) Now launch Continuity Activation Tool and follow the on-screen instructions.
5) If it warns of an unsupported macOS version, simply select YES to continue.
6) If using a BT 4.0 dongle, insert it into a USB port when prompted. (If you have replaced the Wi-Fi card entirely, this should have been in place before beginning).
7) Be sure to peruse the initial readout, which will give details of what is compatible and what is not, and whether any errors have been found. An example of the readout is below.
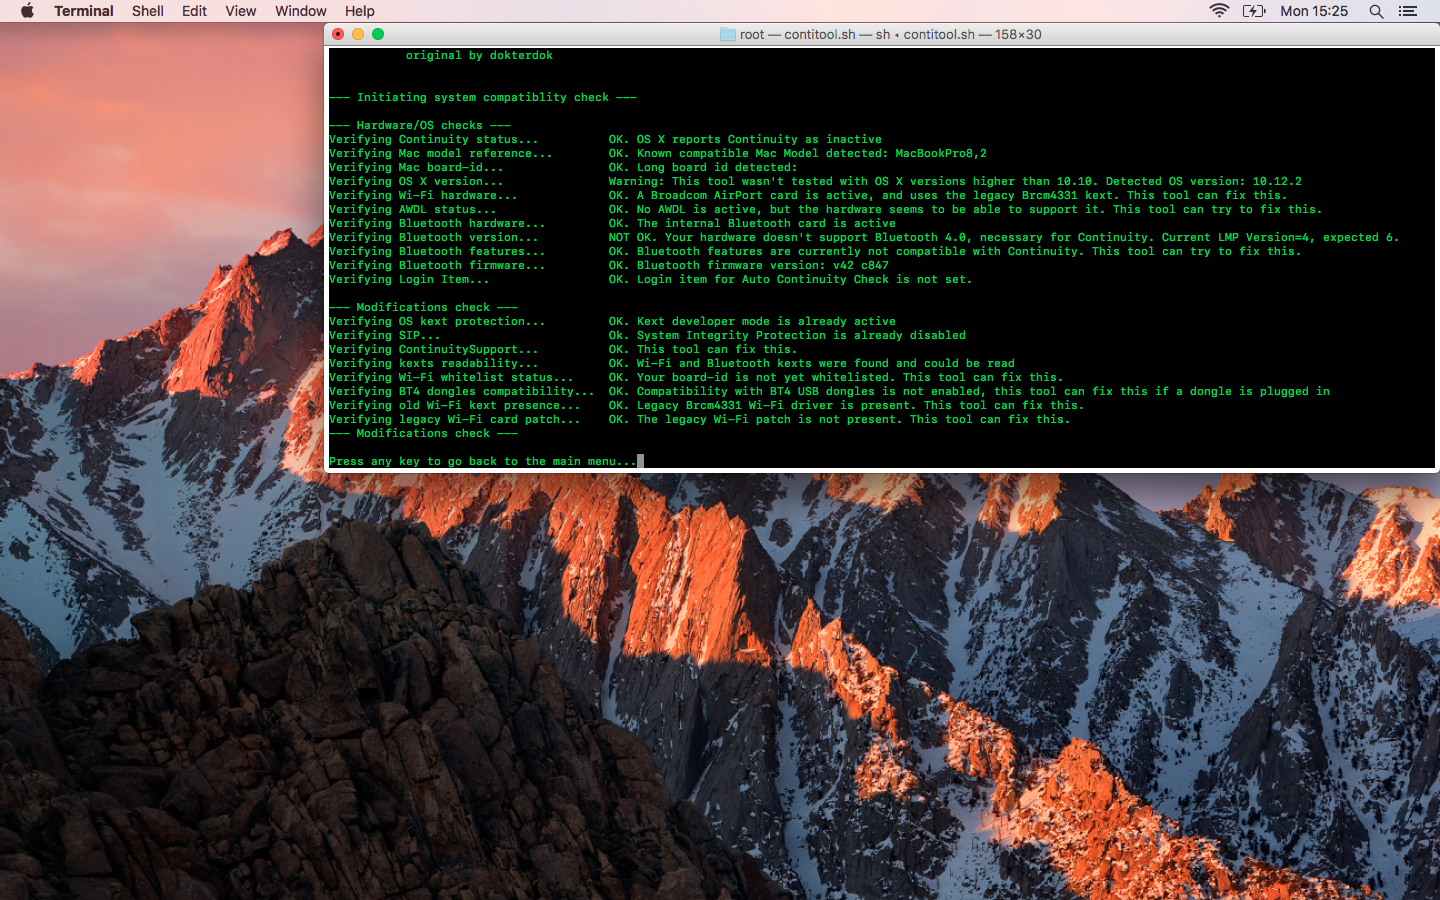
8) Once the patching is complete, you will need to reboot. Afterwards, the Continuity features should be active. You can verify this is the case by opening Continuity Activation Tool again and selecting a system report instead of actually patching. You can also check for Continuity functionality as shown in the images below:

The first screenshot is from before running Continuity Activation Tool. It shows the old AirDrop interface, and no option for Handoff in System Preferences > General.
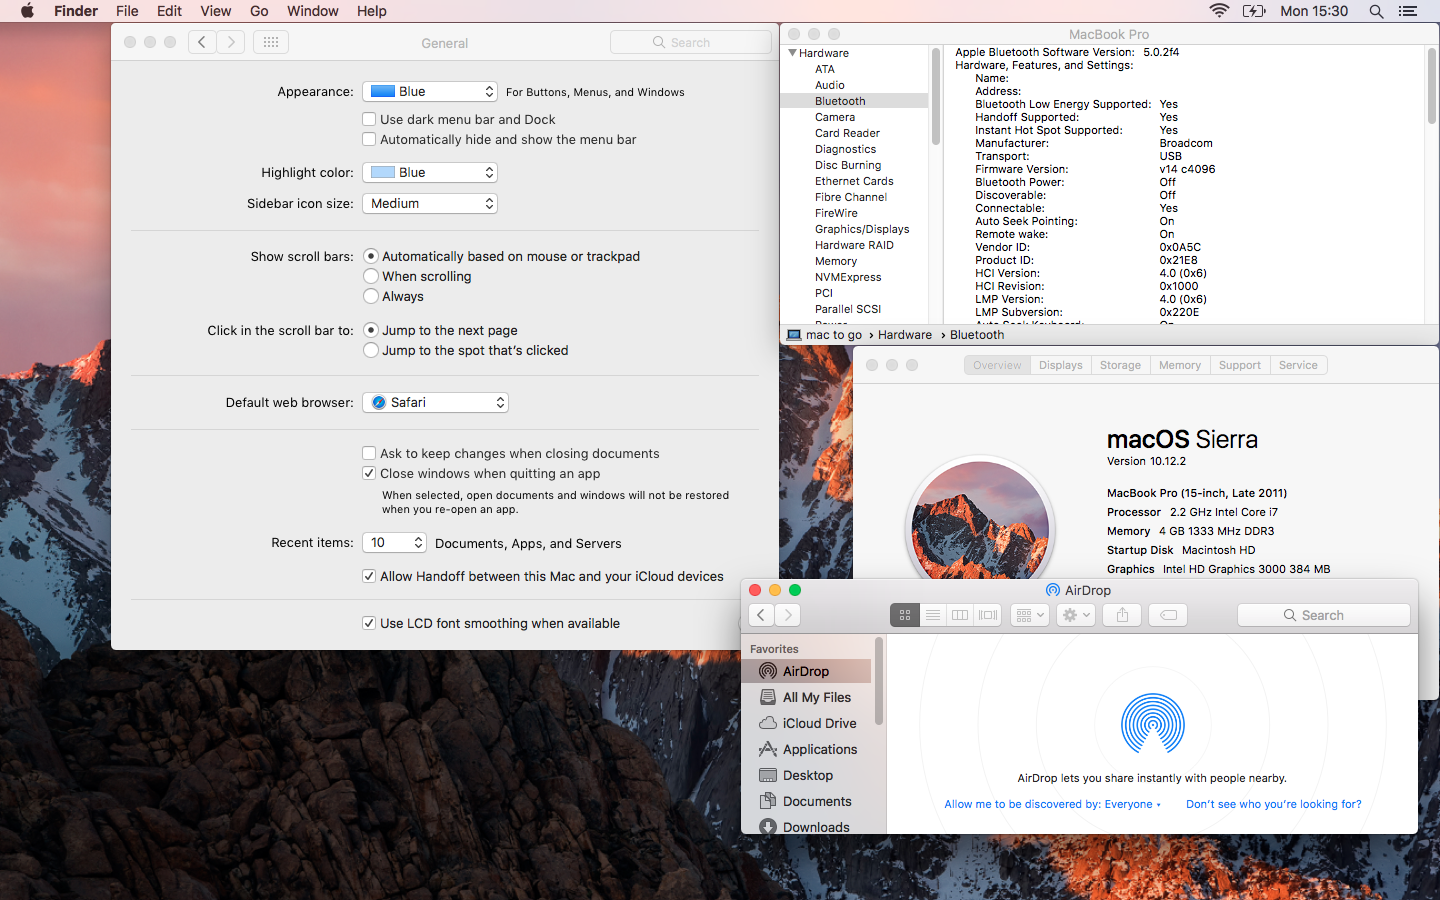
The second screenshot shows the MacBook Pro 2011 after running Continuity Activation Tool and with a BT 4.0 LE dongle. Both the modern AirDrop interface and Handoff from iOS devices are now enabled, as you can see.
Removing Continuity Activation Tool
If something has gone wrong to the extent that your Mac kernel panics on boot, start at Step 1. If the Mac boots fine but has problems, or you just want to revert to stock, start at Step 5. If none of these steps fix your machine, see the note at the bottom.
1) Boot your Mac from its Recovery HD by holding cmd-R after pressing the power button.
2) Once in Recovery, open a Terminal window and connect the USB or external hard drive which contains the backups of the kexts from Step 2 of the installation instructions above.
3) Use Terminal to copy your backups from the external drive to /System/Library/Extensions on the boot drive, replacing the edited ones.
4) Reboot to your boot drive.
5) Launch Continuity Activation Tool and select Option 3 – Uninstall.
6) Allow it to complete and reboot.
7)(Optional: depending on whether you had SIP enabled to begin with. Boot to recovery and re-enable SIP if desired.
Note: If these steps don’t work and your Mac will not boot up to the main OS to troubleshoot, you must restore from a backup or reinstall the OS. Booting from the Recovery HD and re-installing the OS will fix the problem and will retain your data provided you don’t wipe the drive as part of the process. Alternatively, a Carbon Copy Cloner backup or Time Machine backup can be used for a full restore of the system.
Done and done. I’ve liked giving a new lease of life to a 6-year old Mac with Continuity Activation Tool. In combination with an SSD, and a BT dongle that cost a tenner on sale, it’s practically indistinguishable from a current machine for day-to-day use.
Let me know how you get on with this guide, and if you have any machines which didn’t make Apple’s Continuity requirements originally, but which can get involved now.